How to Install WPC Decking: A Step-by-Step Guide for 2026
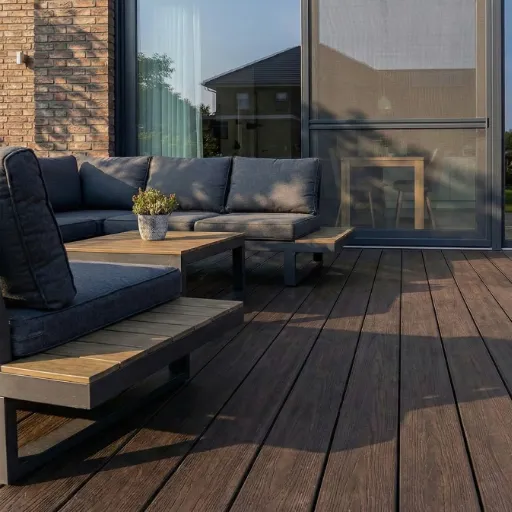
To install WPC decking, build a level substructure with joists spaced 300-400 mm apart depending on board type, leave expansion gaps of 3-8 mm between boards, fasten with hidden clips or stainless steel screws, and finish exposed edges with fascia or picture framing. A deck that looks perfect on day one can start to sag, buckle, or trap water within a season if any of those steps are wrong.
Most installation guides list the steps. Few explain the decisions that determine whether your deck lasts five years or twenty-five. We supply WPC decking from factories in Linyi, China, and we see the same preventable problems repeat across international shipments: boards installed too tightly, joists spaced too wide, and fasteners that rust or restrict natural expansion. This guide is written for contractors, distributors, and capable DIYers who want a complete workflow, not just a checklist.
You will learn how to choose between DIY and professional installation, what tools and materials you need, how to build the substructure, how to calculate expansion gaps for your climate, and how to avoid the mistakes that cause the most warranty claims.
Key Takeaways
- Joist spacing is the most common cause of WPC deck failure: 300 mm for hollow, 350-400 mm for solid boards.
- Leave 3-5 mm between board ends, 3-8 mm between board sides, and 8-13 mm at perimeter walls for thermal expansion.
- Hidden clips give the cleanest finish; face screws are stronger for stairs, borders, and high-traffic areas.
- Acclimate boards for 48-96 hours before installation, especially in hot, cold, or humid climates.
- Professional installation typically adds $40-$220/m² depending on region, complexity, and labor rates.
DIY vs Professional Installation: Which Is Right for You?
WPC decking is more DIY-friendly than hardwood or tile, but a successful install still requires accurate measuring, level framing, and patience with expansion gaps. The decision usually comes down to project size, your tool access, and how much risk you are willing to absorb.
When DIY Makes Sense
- Small, rectangular decks under 30 m² with simple ground-level framing.
- Experienced home improvers who already own a circular saw, drill, level, and tape measure.
- Tight budgets where labor savings of $40-$150/m² matter more than speed.
- Straight layouts without multi-level changes, curved edges, or integrated stairs.
A homeowner in Brisbane installed a 25 m² patio himself using grooved WPC boards and hidden clips. He spent two weekends on the job, saved roughly $2,500 in labor, and told us the deck still looked solid after two summers because he followed the 300 mm joist spacing and left 10 mm at the house wall.
When to Hire a Professional
- Large or complex decks over 50 m², multi-level designs, or commercial load requirements.
- Unstable ground conditions that need proper footings, drainage, or retaining work.
- Tight timelines where a crew can finish in days what takes a DIYer weeks.
- Warranty concerns: Some manufacturers require professional installation for full warranty coverage.
A contractor in Manchester learned the opposite lesson. He took on a 90 m² restaurant terrace as a side job, underestimated the slope correction, and ended up with standing water under the boards. The WPC did not rot, but the timber subframe did. The rework cost him £4,200 and the client.
| Factor | DIY | Professional |
|---|---|---|
| Cost | Lower (no labor) | Higher (labor 40−220/m²) |
| Time | Longer | Faster |
| Finish quality | Variable | Consistent |
| Risk of errors | Higher | Lower |
| Warranty | Check requirements | Usually easier to claim |
How to Install WPC Decking: Tools and Materials You Will Need
Having the right tools on site before you start prevents the halfway runs to the hardware store that kill momentum and cause mistakes. For a broader overview of board types and grades before you order, see our complete WPC decking buyer’s guide.
Essential Tools
- Tape measure and carpenter’s square
- Spirit level (at least 1200 mm) and string line
- Circular saw, or miter saw with fine-tooth carbide blade
- Power drill with screwdriver and drill bits
- Rubber mallet
- Decking board spacers or gap gauges
- Pencil, chalk line, and safety gear (gloves, goggles, dust mask)
Materials
- WPC decking boards
- Treated timber, composite, or metal joists
- Starter clips, T-clips, or hidden fasteners
- Stainless steel or coated deck screws
- Concrete pads, posts, or footings for raised decks
- Gravel and weed membrane for ground-level decks
- Fascia boards and edge trim (optional)
For help choosing between solid and hollow boards before you order materials, read our guide on solid vs hollow WPC decking.
How to Install WPC Decking Substructure: Site Prep and Joists
The substructure is the foundation of every WPC deck. Get this wrong and even premium boards will bounce, warp, or separate over time.
Ground Preparation
Clear vegetation, roots, and debris from the deck area. For ground-level decks, lay a compacted gravel base and a weed membrane. For raised decks, set posts on concrete footings below the frost line if your climate requires it. The frame must sit level, stable, and slightly above the surrounding ground to allow airflow underneath.
A minimum clearance of 50 mm between the bottom of the joists and the ground is recommended. Less than that traps moisture and reduces board life.
Joist Spacing Guidelines
This is the single most important specification. WPC boards flex more than solid timber, so they need closer support.
| Board Type | Thickness | Max Joist Spacing | Typical Use |
|---|---|---|---|
| Square hollow | 20-25 mm | 300 mm | Residential patios |
| Round hollow | 20-25 mm | 350 mm | Standard residential |
| Solid uncapped | 25-30 mm | 350-400 mm | General residential |
| Solid capped / co-extruded | 25-30 mm | 400 mm | Heavy-duty/commercial |
Always reduce spacing for heavy loads such as hot tubs, planters, or high-traffic walkways. When in doubt, go 50 mm closer rather than wider. The small extra cost in joists is far less than a callback.
Slope and Drainage
Build a slight slope of 1-2% (about 10-20 mm per meter) away from any building. Flat decks hold water, and water leads to mold, mildew, and subframe rot, even if the WPC itself is waterproof.
Double Joists at Butt Joints
Every board end must rest on its own support. Where two boards meet end-to-end, install a double joist so each end has independent support. Butt joints on a single joist are one of the fastest ways to create a weak line across the deck.
How to Install WPC Decking Boards: Acclimation, Layout, and Fastening

WPC boards expand and contract with temperature and humidity. Installing them straight from a hot container or cold warehouse without acclimation is a common source of gapping problems later.
Board Acclimation
Lay boards flat, off the ground, in a shaded and ventilated area at the installation site for 48-96 hours. Extend this to 72+ hours in very humid, arid, or cold climates. The goal is to let the boards equalize with local conditions before they are locked in place.
A distributor in Dubai once called us about boards that had expanded and buckled two months after installation. The installer had pulled them straight from a container that sat in port at 55°C and fixed them tightly the same day. Acclimation would have prevented the entire issue.
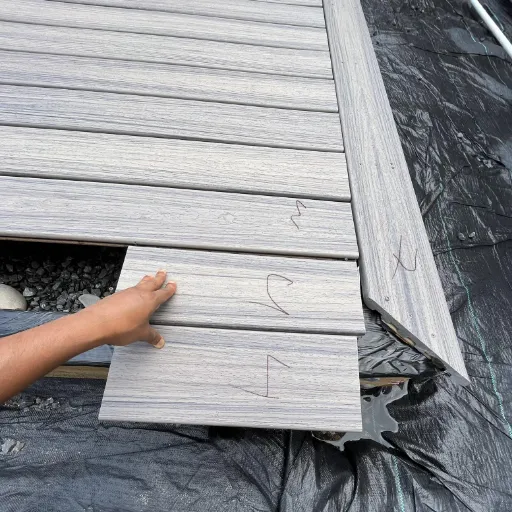
Layout Planning
- Run boards perpendicular to the house or the longest edge for the cleanest appearance.
- Use the longest boards available to minimize butt joints.
- For large decks over 6 m in any direction, plan breaker boards or expansion joints to release stress.
- Picture framing, a border board around the perimeter, hides cut ends and gives a finished look.
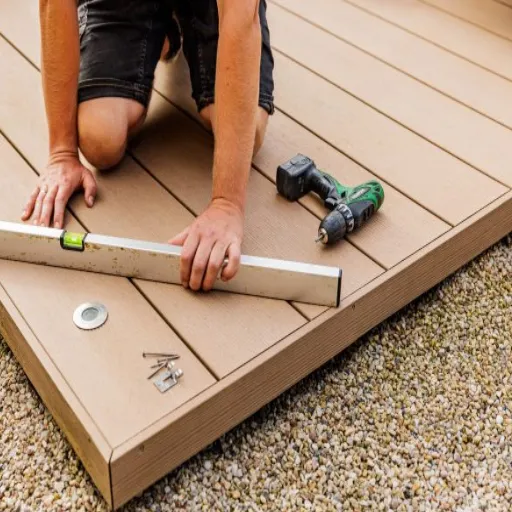
How to Install the First WPC Decking Board and Starter Clips
The first board sets the alignment for everything that follows. Take your time here.
- Attach starter clips along the first joist or perimeter, spaced according to the clip manufacturer’s instructions (usually 300-400 mm).
- Leave an 8-13 mm expansion gap between the board edge and any wall, post, or fixed structure.
- Set the first board into the starter clips and check that it is straight and level.
- Use a rubber mallet to seat the board gently. Do not hammer directly on the board surface.
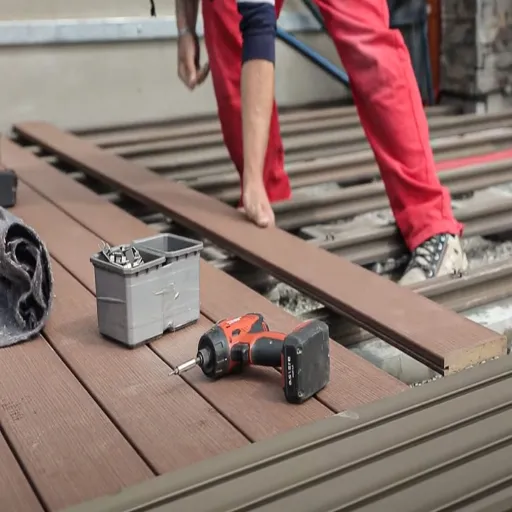
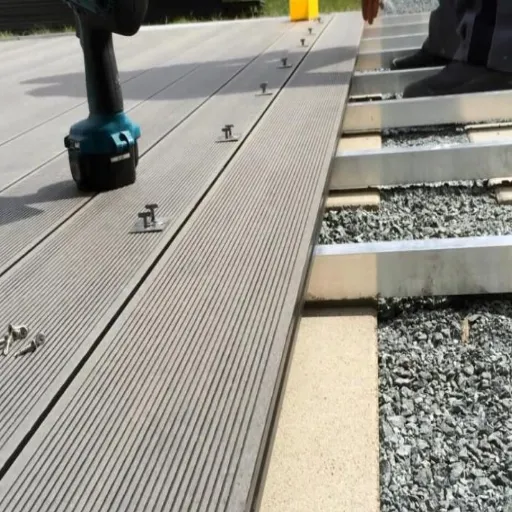
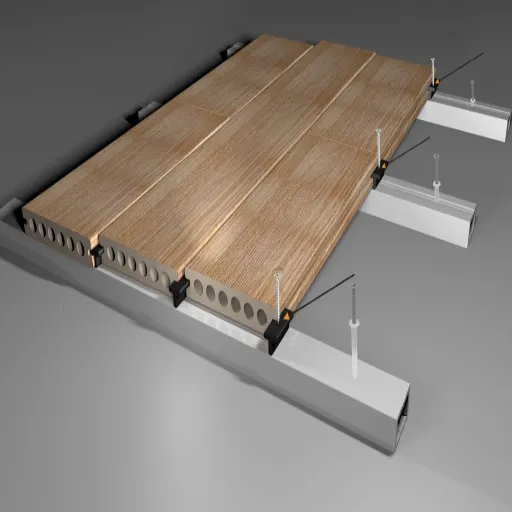
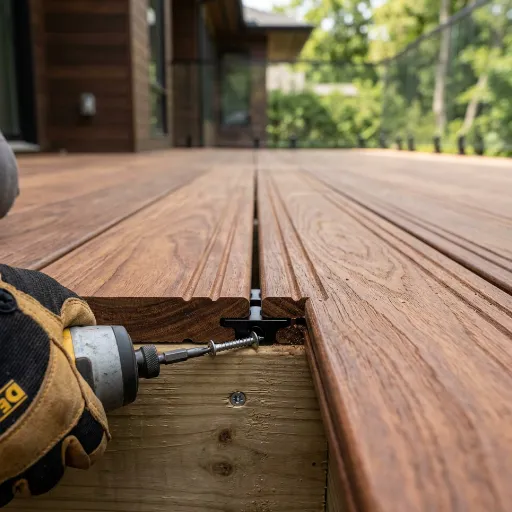
How to Lay WPC Decking Field Boards with Hidden Fasteners
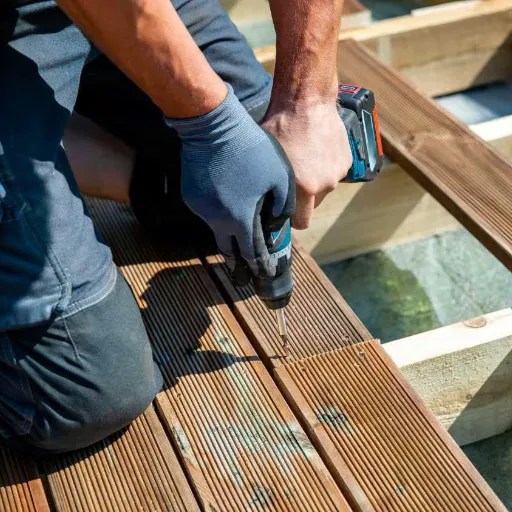
Hidden clips slide into the side grooves of grooved WPC boards and screw into the joists. This method leaves no visible fasteners on the surface and allows natural expansion and contraction.
- Insert clips into the groove of the installed board.
- Screw each clip into the joist, but do not fully tighten until the next board is aligned.
- Drop the next board onto the clips and tap it into place.
- Use spacers to maintain consistent side gaps of 3-8 mm, depending on the clip system and climate.
- Continue across the deck, checking level and alignment every few boards.
Cutting boards: Use a fine-tooth carbide blade. Support the board near the cut line to reduce vibration and chipping. Pre-drill holes before face-screwing cut ends to prevent splitting.
How to Face-Screw WPC Decking Edges, Stairs, and High-Stress Areas
Hidden fasteners are ideal for the main deck surface, but they are not always strong enough for high-stress areas.
Use face screws for:
- Perimeter boards and picture-frame borders
- Stair treads and ramps
- High-traffic or commercial walkways
- Square-edge or solid boards without grooves
Pre-drill pilot holes and use stainless steel or coated screws that match the board color. Do not over-tighten. Screws should hold the board firmly but still allow slight movement.
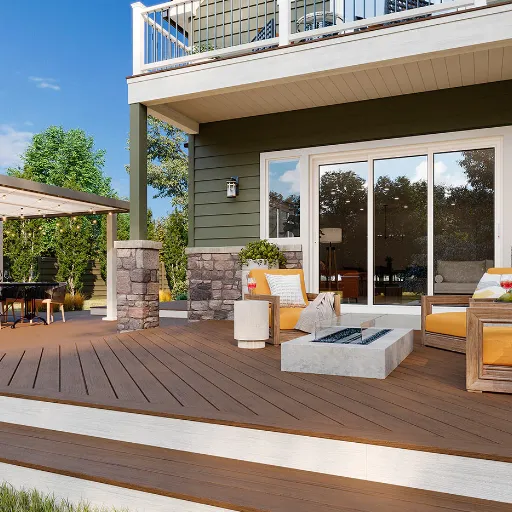
How to Finish WPC Decking Edges: Fascia and Picture Framing
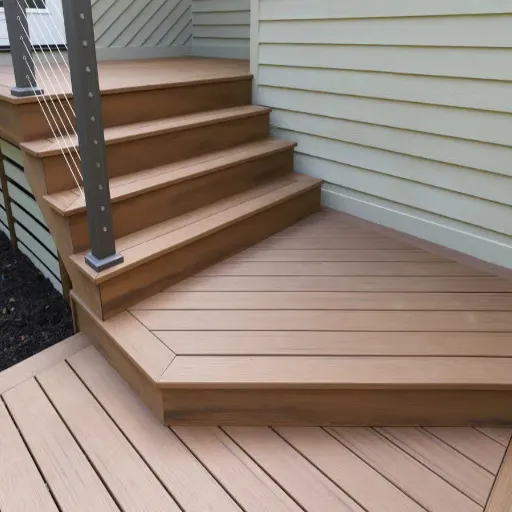
Exposed board ends and substructure framing look unfinished and can absorb water at the cut. Edge treatment solves both problems.
Fascia Boards
Fascia covers the vertical edge of the deck frame. Pre-drill 4 mm countersunk pilot holes and fix with 50 mm screws into the rim joist. Leave approximately 0.2% of the fascia length as an expansion gap at ends and corners.
Picture Framing
Picture framing uses a border board running perpendicular to the field boards. It covers cut ends, gives a custom look, and works well with fascia below for a fully finished edge. Plan expansion gaps carefully at mitered corners.
Final Checks and Long-Term WPC Decking Maintenance
Before calling the job complete, run through this checklist:
- All boards are level with no bounce between joists.
- Expansion gaps are consistent and meet manufacturer specifications.
- Fasteners are secure but not over-tightened.
- The deck slopes away from buildings and sheds water.
- There is adequate ventilation underneath.
- You have recorded the installation date, board batch, and warranty documents.
Clean the surface with mild soap and water to remove construction dust and debris. Avoid pressure washing at close range on the first clean; let the deck settle first.
For ongoing care, see our WPC decking maintenance guide for seasonal cleaning and care tips.
Common WPC Decking Installation Mistakes
These are the errors we see most often in warranty claims and site visits:
- Joists spaced too far apart. This causes sagging, bouncing, and board cracking. Follow the table above.
- No or insufficient expansion gaps. WPC expands in heat. Tight boards buckle.
- Poor drainage or flat framing. Water pools under the deck and damages the substructure.
- Over-tightened fasteners. This restricts expansion and can cause cracking around screws.
- Butt joints on a single joist. Each board end needs its own support.
- Installing without acclimation. Boards that come from extreme temperatures will move after installation.
- Wrong fasteners. Plain steel screws rust and stain the surface. Use stainless steel or manufacturer-approved coated screws.
- Ignoring the manufacturer’s guide. Span tables, gap rules, and clip systems vary by brand. Always read the specific guide for your boards.
Some of these problems are also covered from a product-selection angle in our article on understanding WPC decking limitations.
FAQ
Can I install WPC decking myself?
Yes, if the project is small and simple, and you have basic woodworking tools and patience with measuring and spacing. Complex or large decks are better handled by professionals.
What is the joist spacing for WPC decking?
Typically, 300 mm for hollow boards, 350 mm for round-hollow boards, and 350-400 mm for solid boards. Reduce spacing for heavy loads.
How much gap should I leave between WPC decking boards?
Leave 3-5 mm at board ends, 3-8 mm between board sides, and 8-13 mm at perimeter walls or fixed structures. Wider gaps are needed in hotter climates or when installing in cold weather.
Can WPC decking be installed on concrete?
Yes, but only if the concrete is level, drains well, and you build a raised frame on top of it. Do not lay WPC boards directly on concrete.
How long does WPC decking installation take?
A 20 m² patio takes 1-2 days DIY or one day professional. A 50 m² deck takes 3-5 days DIY or 2-3 days professional. Large terraces over 100 m² can take a week or more.
Should I pre-drill WPC decking?
Yes, especially when face-screwing near board ends or edges. Pre-drilling prevents splitting and gives a cleaner finish.
How much does WPC decking installation cost?
Labor ranges from $40-$100/m² in Australia, £110-£260/m² in the UK, and $110-$220/m² in the US. Complex or multi-level installs can cost more.
Conclusion
Learning how to install WPC decking is not about memorizing a sequence of steps. It is about understanding why each step matters. Joist spacing carries the load. Expansion gaps absorb movement. Drainage protects the frame. Fasteners hold everything without restricting the natural expansion and contraction of the boards.
If you get those four things right, the deck will perform well for decades. If you get them wrong, even the most expensive WPC boards will disappoint.
At Linyi Yuheng, we supply WPC decking to contractors and distributors worldwide, and we are happy to provide installation specifications, sample boards, and batch-specific guidance for your project. If you need technical datasheets, a material quote, or advice on board selection, contact our team today.
Categories:
Blog
Related Articles