WPC Acoustic Panel Installation: Step-by-Step Wall Guide
WPC acoustic panel installation works best with a batten frame that leaves a 25–50 mm air gap behind the slats. That gap is what turns a decorative wall covering into a genuine acoustic treatment. Without it, the panel still looks good, but it absorbs far less sound.
Most people approach WPC panels like standard wall cladding. They glue them flat to the drywall and expect the room to sound better. It won’t. The air cavity behind the slats is what extends absorption into the mid and low-mid frequencies, where voices, music, and room boom live.
This guide shows you how to install WPC acoustic panels correctly the first time, whether you’re covering one wall in a home office or outfitting a commercial space. You’ll learn three mounting methods, how to cut panels cleanly, what air gap size to use, and the mistakes that waste material and money. We’ll also explain how installation choices affect acoustic performance, so you can match the method to your room’s purpose. For the broader strategy of where panels should go, see our complete acoustic panel placement guide.
Key Takeaways
- A 25–50 mm air gap behind WPC slat panels is essential for meaningful acoustic absorption.
- The batten-frame method performs best; adhesive direct-mount is fastest but weakest acoustically.
- Acclimate panels 24–48 hours, leave expansion gaps, and always start layout from a level reference line.
- Cut panels from the back side with a carbide blade to prevent face chipping.
- Mounting at first reflection points delivers the biggest clarity improvement per panel.
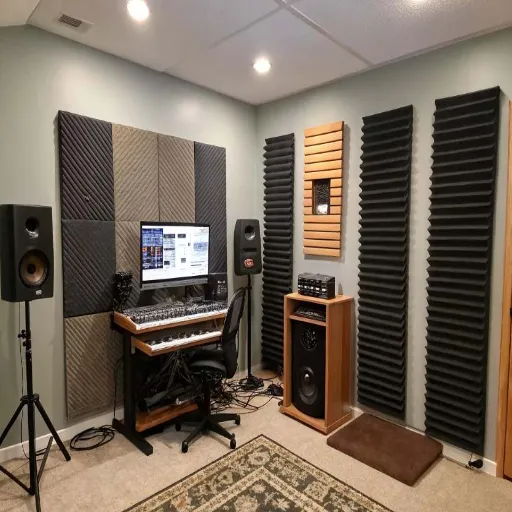
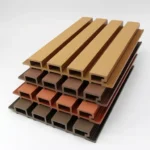
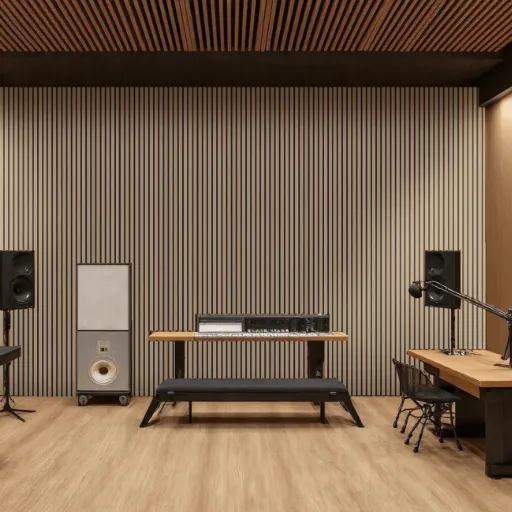
What Makes WPC Acoustic Panels Different
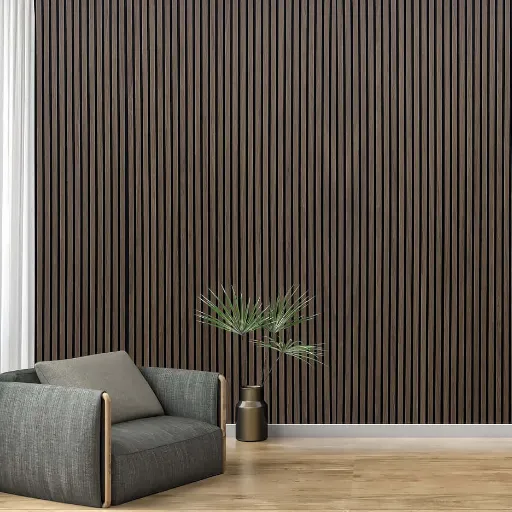
WPC stands for wood-plastic composite. An acoustic WPC panel is typically a rigid composite board covered with a slatted wood veneer and backed with acoustic felt. The slats let sound pass through to the felt, and the felt absorbs energy. The result is a panel that looks like architectural wood and performs like a moderate acoustic absorber.
Most WPC acoustic panels achieve an NRC (Noise Reduction Coefficient) between 0.50 and 0.80. That is lower than fiberglass panels, which often reach 0.85 to 0.95. But WPC panels win on aesthetics. They look like intentional design in a living room, conference room, or restaurant: places where black fabric boxes would feel out of place.
The performance gap narrows when you add an air gap. A 25–50 mm gap can improve effective absorption by roughly 0.1–0.2 NRC. That is the difference between a panel that only tames high frequencies and one that actually controls speech clarity and midrange boom.
The gap acts as a resonant cavity, allowing the felt and the space behind it to absorb lower frequencies than a flush-mounted panel can reach. This is why the WPC acoustic panel installation technique matters so much. Two identical panels can perform very differently depending on how they’re mounted.
Tools and Materials You’ll Need
Gather everything before you start your WPC acoustic panel installation. Stopping mid-install to find a level or the right drill bit wastes time and invites mistakes.
| Tool / Material | Why You Need It |
|---|---|
| Tape measure | Accurate panel and batten cuts |
| Spirit level or laser level | Keeping rows straight |
| Pencil and chalk line | Marking reference lines |
| Stud finder | Locating studs for secure battens |
| Fine-tooth or carbide saw | Cutting WPC without chipping the veneer |
| Drill/driver | Driving screws into battens |
| Utility knife | Trimming felt backing cleanly |
| Wooden battens or furring strips | Creating the air gap structure |
| Black drywall screws | Fastening panels through felt backing |
| Wall plugs/anchors | Securing battens where no stud exists |
| Construction adhesive (optional) | Extra bond for the adhesive method |
| Mineral wool or rockwool (optional) | Filling cavities for maximum absorption |
| Acoustic sealant (optional) | Sealing perimeter for studio-grade performance |
| Safety glasses and a dust mask | Cutting WPC creates fine dust |
If you are covering a large area, rent or borrow a track saw. It makes long, straight cuts faster and cleaner than a circular saw guided by hand.
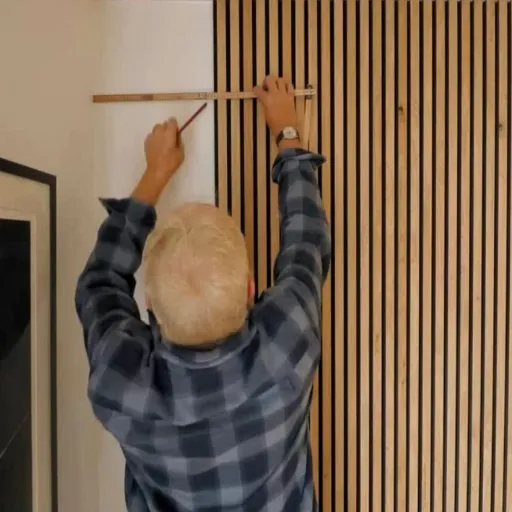
Pre-Installation: Surface Prep and Layout
Good WPC acoustic panel installation starts before the first panel touches the wall.
Prepare the Wall
The wall must be clean, dry, and structurally sound. Remove old wallpaper, loose paint, and nails. Patch holes and sand high spots.
If the wall is freshly plastered, let it cure fully. Trapping moisture behind panels causes mold and weakens adhesive bonds.
Use a stud finder to mark vertical stud lines. Battens should anchor into studs wherever possible. In plaster or masonry walls without exposed studs, use appropriate wall anchors rated for the panel weight.
Acclimate the Panels
Bring the panels into the installation room 24–48 hours before cutting. WPC expands and contracts slightly with temperature and humidity. Acclimating reduces the risk of gaps opening after installation.
Plan the Layout
Measure the wall height and width. Decide whether panels will run vertically or horizontally. Most slat panels look best with horizontal slats at seated ear height and vertical slats for tall feature walls.
Mark a level reference line. Don’t trust the ceiling or floor to be perfectly level. Start from a laser line or chalk line and work outward. Account for electrical outlets, HVAC vents, light fixtures, doors, windows, and expansion gaps at the top, bottom, and corners.
If you’re installing panels for acoustic treatment, mark the first reflection points before you finalize the layout. The spacing of those panels matters too; our guide on spacing acoustic panels correctly explains how to distribute them across the wall.
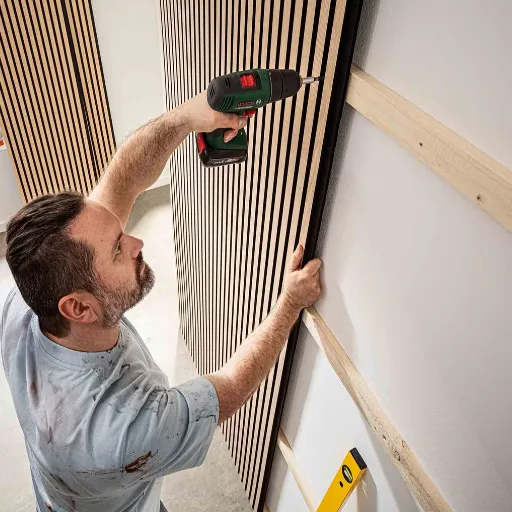
Installation Method 1: Batten Frame with Air Gap (Recommended)
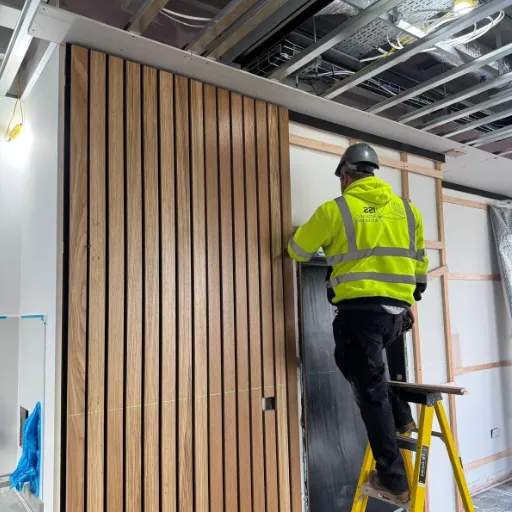
This method gives the best acoustic result and is the standard for WPC acoustic panel installation.
Step 1: Install the Battens
Cut wooden battens to length. A 1×2-inch batten gives you a 25 mm air gap. A 2×2-inch batten gives you about 45 mm, which is ideal for midrange absorption.
Space battens every 40–60 cm vertically or horizontally, depending on panel orientation. Fasten them to studs or use wall anchors where needed. Check each batten with a level.
Step 2: Add Insulation (Optional)
Cut mineral wool or rockwool to fit snugly between the battens. Do not compress it. Compressed insulation absorbs less sound. This step is especially useful in recording studios, podcast rooms, and home theaters.
Step 3: Attach the Panels
Place the first panel on the battens. Use a level to make sure it is straight. Drive black screws through the felt backing into the battens. Use 9–15 screws per panel, depending on size. Butt panels tightly together; the felt overlap usually hides the seam.
Step 4: Leave Expansion Gaps
Leave a 3–5 mm gap at the top, bottom, and sides. Cover these with trim or shadow gaps for a clean finish. Without expansion gaps, panels can buckle seasonally.
Step 5: Finish the Edges
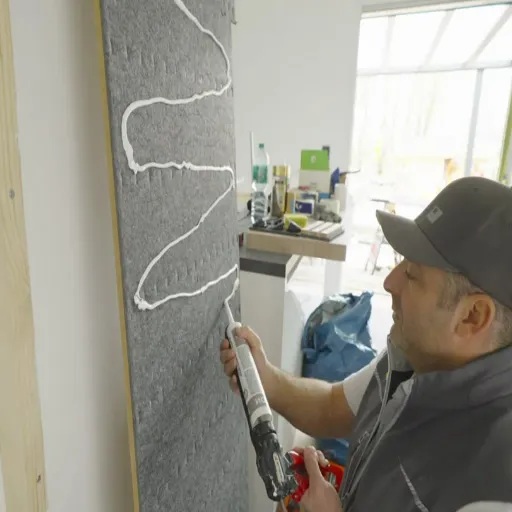
Install corner trim, end caps, or caulk the perimeter with acoustic sealant if you need maximum performance. Sealed edges prevent sound from leaking around the panel rather than passing through it.
This batten-frame method is what turns a WPC wall panel into an acoustic panel. For more on spacing strategy, see our guide on spacing acoustic panels correctly.
WPC Acoustic Panel Installation Method 2: Direct Glue / Adhesive Mount
The adhesive method is the fastest and cleanest-looking option. It is best for smooth drywall or plaster in rooms where appearance matters more than maximum acoustic performance.
Apply a high-strength, solvent-free construction adhesive to the back of the panel in a zigzag or dot pattern. Press the panel firmly against the wall and hold it for 30–60 seconds. Use temporary braces or painter’s tape to keep panels in place while the adhesive cures, usually 24 hours.
The downside is acoustic. A flush-mounted panel has almost no air gap, so it mainly absorbs high frequencies. It will reduce flutter echo and some harshness, but it will not control midrange clarity or low-mid buildup well.
Use this method for lobbies, retail spaces, or bedrooms where the goal is design first and mild acoustic improvement second.
WPC Acoustic Panel Installation Method 3: Direct Screw Mount
Direct screw mounting is the most secure WPC acoustic panel installation method and works well for ceilings, high-traffic areas, or panels that might be bumped or touched.
Drill pilot holes through the felt backing at batten or stud locations. Fasten with black screws that will be hidden by the next panel or by matching screw caps. Space screws every 40–60 cm.
You can combine direct screw mounting with small spacers or washers behind the panel to preserve a partial air gap. This hybrid approach gives more security than adhesive while keeping some acoustic benefit.
Ceiling panels should always use screws, never adhesive alone. Gravity and temperature cycles will eventually overcome glue.
Cutting WPC Acoustic Panels
Proper cutting technique ensures clean results in any WPC acoustic panel installation.
Always cut from the back side. The face veneer is thin and prone to chipping out. Use a fine-tooth or carbide-tipped blade. Apply painter’s tape along the cut line on both sides for extra protection.
For outlet or switch cutouts, mark the panel in place, then drill a starter hole and cut with a jigsaw or oscillating multi-tool. Cut the felt backing separately with a sharp utility knife.
Long rip cuts are easiest with a track saw or table saw. If you only have a circular saw, clamp a straightedge to the panel and move slowly. Let the blade do the work. Forcing it causes burns and chips.
Cost and Time Estimates
Here is what to expect for a typical DIY or contractor-installed WPC acoustic panel installation project. Before you budget, make sure you have already calculated coverage for your room size and goals.
| Project Size | DIY Time | Material Cost (USD) | Installed Cost with Labor |
|---|---|---|---|
| Small feature wall (~9 m² / 100 sq ft) | 2–4 hours | $150–$300 | $300–$600 |
| Medium room (~28 m² / 300 sq ft) | 6–10 hours | $400–$800 | $800–$1,500 |
| Large commercial space (90+ m² / 1,000 sq ft) | 2–5 days | $1,500–$3,500 | $3,000–$7,000 |
Material prices typically range from $15–$35 per m² at wholesale, and $50–$100+ per m² installed. Labor rates run $15–$30 per m², depending on region and complexity. Complex cutouts, curved walls, or ceiling work increase both time and cost.
When Li, a contractor in Hangzhou, quoted a 20 m² home theater project, he budgeted two days. The client wanted visible slats and real acoustic improvement. Li chose the batten-frame method with mineral wool fill. The installation took one and a half days, and the client noticed the dialogue clarity improvement immediately during the first movie night.
Common WPC Acoustic Panel Installation Mistakes
Even experienced installers make these errors. Avoid them, and you’ll save time, money, and rework.
Skipping the air gap. Flush-mounting destroys the acoustic value of a WPC slat panel. Always use battens or spacers unless the project is purely decorative.
Ignoring expansion gaps. WPC expands slightly with heat and humidity. A 3–5 mm perimeter gap prevents buckling and visible seam stress.
Poor surface prep. Dust, grease, or loose paint prevents adhesive and battens from bonding properly. Clean and patch first.
Using the wrong adhesive. Standard glue may not bond WPC composite to painted drywall. Use a solvent-free construction adhesive rated for both materials.
Misalignment. One crooked first row throws off every panel above it. Use a laser level or chalk line and check every row.
Blocking outlets and HVAC. Plan the layout around fixtures before cutting. It’s much cheaper to shift panel placement on paper than to recut panels.
Insufficient acclimation. Installing panels straight from a cold warehouse into a heated room invites gaps later. Let them sit for 24–48 hours.
Over-tightening screws. This cracks tongues, deforms slats, and damages the felt backing. Tighten until snug, then stop.
How to Maximize Acoustic Performance

WPC acoustic panel installation is only half the acoustic equation. Placement matters just as much.
Mount panels at the first reflection points: the spots where sound bounces directly from your speakers or voice to your ears. In most rooms, these are the side walls and front wall at seated ear height. Treating these first delivers the biggest clarity improvement.
Pair wall panels with other treatments for a complete room. Ceiling clouds handle overhead reflections. Bass traps in corners control low-frequency buildup. For dedicated listening or recording spaces, our office acoustic panel placement guide covers treatment strategies beyond basic installation.
For the lowest frequencies, consider a hybrid system: battens with mineral wool behind the WPC slats. The slats provide the visible finish, and the mineral wool does the heavy absorption. This setup can rival fiberglass panels in performance while looking like custom millwork.
If your goal is a professional recording or mixing space, combine WPC panels with bass traps placed in corners and along ceiling-wall junctions.
Conclusion
WPC acoustic panel installation is straightforward, but the details decide whether your room looks good or sounds good too. The batten-frame method with a 25–50 mm air gap gives you both. Adhesive mounting gives you speed and clean aesthetics but sacrifices acoustic performance. Direct screw mounting is best for ceilings and high-traffic walls.
Start with a level layout, acclimate your panels, cut from the back, and leave expansion gaps. Mount at first reflection points when acoustic improvement is the goal. And don’t forget the optional mineral wool fill. It’s what separates a decorative wall from a genuine acoustic treatment.
If you’re planning a project and want guidance on panel selection, layout, or bulk orders, contact our team for support. For the complete room strategy, return to our full acoustic panel placement strategy.
A well-executed WPC acoustic panel installation should be felt with your ears before it’s admired with your eyes.
Categories:
Blog
Related Articles