Home Studio Acoustic Panel Placement: The Complete Guide for Recording Studios
Your mixing position is the most important square foot in your studio. Treat it wrong, and every mixed decision is compromised. Home studio acoustic panel placement determines whether your recordings sound professional or amateur, yet most home studio builders get it wrong. They hang panels randomly, treat only one wall, or buy foam packs that do almost nothing for low frequencies.
The problem is not the panels. It is where they go. A single 2-inch fiberglass panel at a first reflection point outperforms five foam squares scattered across the back wall. Proper acoustic panel placement for recording studios follows a repeatable framework based on room acoustics, not guesswork.
This guide walks through the six priority zones for home studio acoustic panel placement, budget-based strategies from $200 to $3,000+, and material-specific adjustments for fiberglass, PET felt, WPC, and foam. Whether you are building a vocal booth, a mixing room, or a hybrid studio that doubles as a home office, the placement principles below will save you money and deliver measurable improvement.
Key Takeaways
- First reflection points on side walls and a ceiling cloud above the mixing position deliver the biggest per-panel improvement in any home studio.
- Corner-mounted bass traps absorb 2-3x more low-frequency energy than wall-mounted panels, making them the highest-priority purchase for rooms under 200 square feet.
- The 38% rule places your listening position at 38% of the room length from the front wall, which minimizes standing wave problems before any treatment is added.
- Material choice changes placement strategy: WPC panels need air gaps and work best as feature walls, while fiberglass panels can mount flush for broadband absorption.
- A phased approach (budget, standard, professional) lets you treat your studio incrementally without wasting money on low-impact zones first.
Why Placement Matters More Than Quantity in Home Studios
Most home studio builders measure acoustic treatment by coverage percentage. They calculate wall surface area, buy enough panels to cover 25-30%, and assume the job is done. This approach ignores a fundamental truth about room acoustics: where you place a panel matters far more than how many you hang.
A 4×2-foot fiberglass panel mounted at the first reflection point on a side wall can reduce early reflections by 8-12 dB. The same panel mounted on the back wall behind the listening position might reduce reflections by only 2-3 dB. That is a fourfold difference in effectiveness from the same product.
RT60 (reverberation time) is the standard measurement for studio acoustics. Professional mixing environments target an RT60 of 0.3-0.5 seconds, measured across the 500 Hz to 4 kHz range. Home studios without treatment typically measure 0.8-1.5 seconds. The gap between untreated and treated is significant, but closing it requires a strategic acoustic panel placement that home studio builders often overlook.
Common placement failures include treating only the wall behind the monitors (leaves side reflections untouched), covering the entire rear wall with absorption (kills room ambience without fixing early reflections), and ignoring corners entirely (bass buildup persists regardless of wall treatment). A studio acoustic treatment layout must address all six priority zones in order of impact, starting with the mixing position.
Material choice also affects placement strategy. Fiberglass panels with an NRC of 0.85-0.95 work effectively when mounted flat against walls. WPC panels with an NRC of 0.50-0.80 require an air gap to achieve their rated absorption. Knowing this difference before you mount a single panel prevents expensive rework.
For a deeper breakdown of how many panels each room size requires, see our acoustic panel calculator guide.
A note on treatment vs. soundproofing: Acoustic panel placement addresses room acoustics, not soundproofing. Panels reduce reflections inside the room but do not block sound from entering or leaving. Soundproofing requires mass, decoupling, and sealing air gaps, a separate project from the studio acoustic treatment layout. If you need both, start with acoustic treatment first since it directly affects what you hear and record.
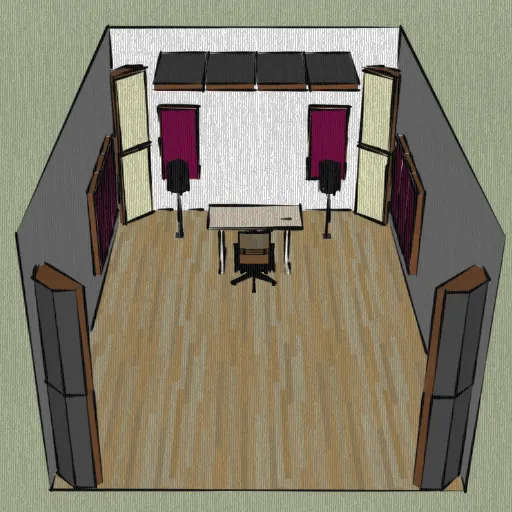
The 6 Priority Zones for Home Studio Acoustic Panel Placement
An effective studio acoustic panel layout follows a strict priority order. These six zones are ranked by impact on the listening position:
| Priority | Zone | Impact | Panel Type |
|---|---|---|---|
| 1 | First Reflection Points (Side Walls) | Highest per-panel improvement | 2″ fiberglass, 4×2 ft |
| 2 | Ceiling Cloud | Controls vertical reflections | 2-4″ fiberglass, suspended |
| 3 | Bass Traps (Corners) | 2-3x more bass absorption | 4-6″ thick, floor-to-ceiling |
| 4 | Rear Wall | Late reflection control | 2-4″ absorption or diffuser |
| 5 | Front Wall Behind Monitors | Reduces monitor rear radiation | 2-4″ broadband |
| 6 | Floor Treatment | High-frequency control | Carpet or rug |
Here is how each zone works in practice.
First Reflection Points (Side Walls)
First reflection points are where sound from your studio monitors first bounces off a wall before reaching your ears. These early reflections arrive 5-15 milliseconds after the direct sound, smearing stereo imaging and reducing vocal clarity.
The mirror trick identifies these points precisely. Sit in your mixing position. Have someone slide a mirror along the side wall. Wherever you can see the tweeter of the near monitor in the mirror, that is a first reflection point. Mark it. Place a 2×4-foot or 4×2-foot panel centered on that mark.
Both side walls must be treated symmetrically. If the left wall has a panel at the first reflection point but the right wall does not, your stereo image shifts toward the untreated side. This asymmetry is one of the most common acoustic panel placement mistakes for recording studios. Our detailed first reflection points guide covers the mirror technique and optimal panel sizing for different room dimensions.
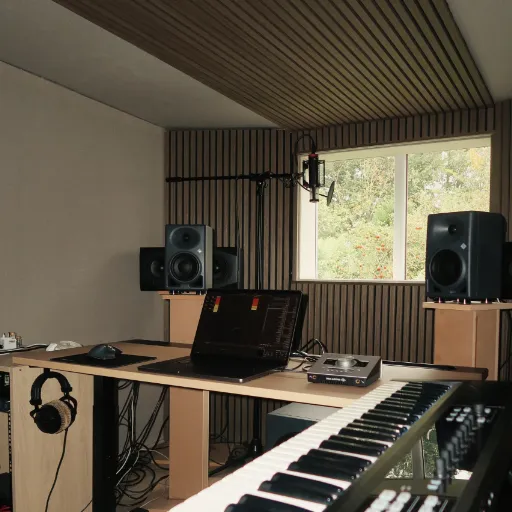
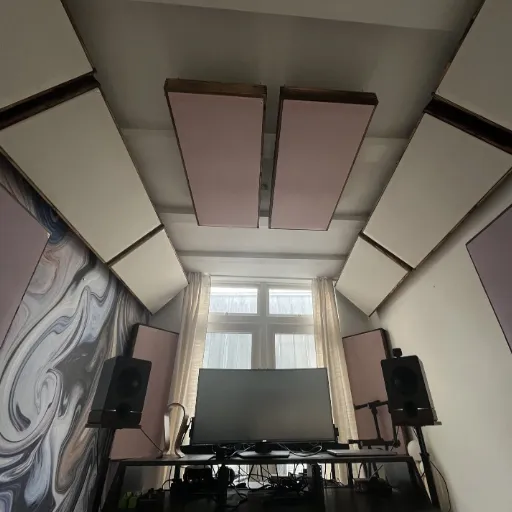
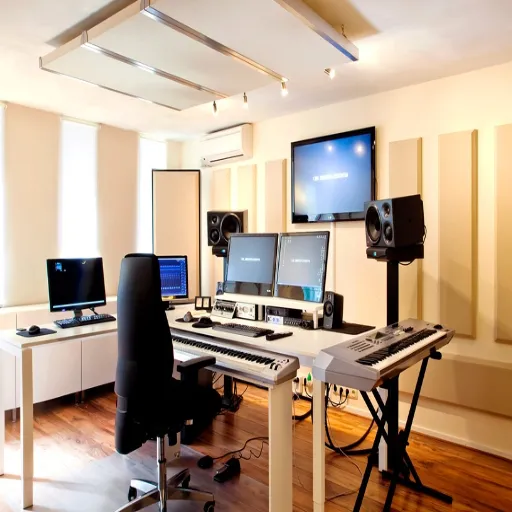
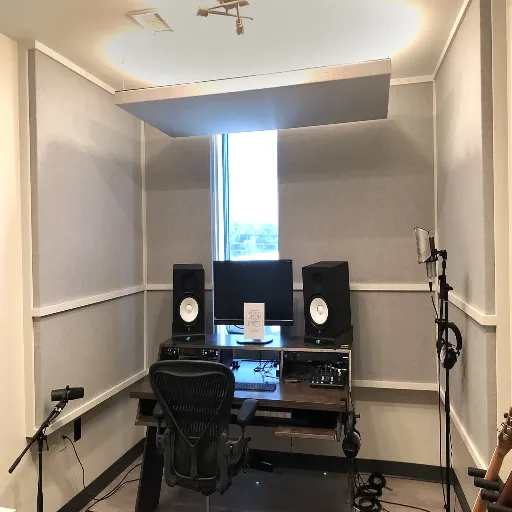
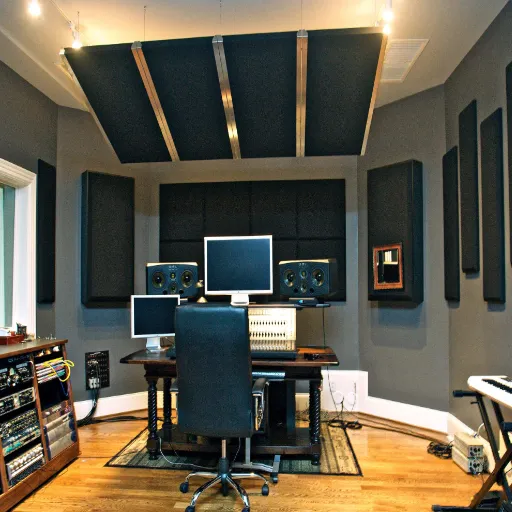
Ceiling Cloud Above Mixing Position
The ceiling above your mixing position is the second-highest priority zone. Sound bounces off the ceiling just as it bounces off the side walls, and vertical reflections are harder to identify by ear.
A ceiling cloud is a panel or group of panels suspended horizontally above the listening position, typically 2-4 feet overhead. The coverage area should extend from slightly in front of the listening position to slightly behind it, roughly a 4×4-foot or 4×6-foot rectangle.
Ceiling treatment is especially critical in rooms with flat, hard ceilings (drywall, concrete). Rooms with drop ceilings already have some absorption from the ceiling tiles, though the NRC of standard tiles is usually too low to replace dedicated acoustic panels.
Bass Traps in Corners
Low frequencies accumulate in room corners. Where two walls meet (dihedral corners) and where three surfaces meet (trihedral corners, like where two walls meet the ceiling or floor), bass energy concentrates 2-3 times more intensely than on flat walls.
Bass traps are thick panels, typically 4-6 inches deep, placed floor-to-ceiling in corners. The most effective placement targets the four vertical corners of the room first. If the budget allows, add traps to the four ceiling-wall corners next.
The physics are straightforward: longer wavelengths (low frequencies) require thicker material to absorb. A 2-inch panel absorbs frequencies above 500 Hz effectively but does almost nothing at 100 Hz. A 6-inch panel with an air gap extends absorption down to 80-100 Hz. This is why bass traps use the thickest panels in any studio acoustic treatment layout. GIK Acoustics’ room setup methodology provides detailed guidance on corner treatment for different room sizes.
For more details on corner treatment strategies, see our bass trap placement guide.
Rear Wall Treatment
The rear wall behind the listening position presents a choice: absorption or diffusion.
In small rooms (under 150 square feet), absorption is usually the better option. A broadband absorber on the rear wall reduces late reflections that muddy the sound. In larger rooms (over 200 square feet), a diffuser scatters sound energy without making the room feel dead. This preserves some natural ambience while preventing strong reflections.
A hybrid approach works well in medium rooms: place absorption panels at ear height and a diffuser above them. This controls the most problematic reflections while maintaining a sense of space.
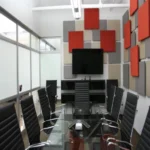
Front Wall Behind Monitors
The wall behind your studio monitors, often called the front wall, benefits from broadband absorption. Sound radiates from the back of the monitors as well as the front, and reflections off the front wall bounce back toward the listening position.
Placing a panel or group of panels directly behind each monitor reduces these rear-wall reflections. This is particularly important for ported monitors, which emit significant low-frequency energy from the port opening.
Floor Treatment
Floor treatment is the lowest priority for most home studios, but it matters in certain situations. Hard floors (wood, tile, concrete) reflect high-frequency energy that can brighten the room unnaturally. A thick area rug or carpet between the mixing position and the front wall absorbs these reflections.
If your studio has carpet, floor treatment is usually unnecessary. If you have hard floors, a rug covering the area from the front wall to slightly behind the listening position is a simple, effective addition.
Home Studio Acoustic Panel Placement by Budget Tier
Not every home studio has the budget for full-room treatment. A phased approach lets you prioritize the highest-impact zones first and expand treatment over time.
| Tier | Budget | Panel Count | Priority Zones Covered | Target RT60 |
|---|---|---|---|---|
| Budget | $200-500 | 8-12 | First reflection + bass traps | 0.6-0.8s |
| Standard | $500-1,500 | 16-24 | All 6 zones, balanced | 0.4-0.6s |
| Professional | $1,500-3,000+ | 24-40+ | Full treatment + diffusion | 0.3-0.4s |
Budget Tier ($200-500)
With 8-12 panels, focus exclusively on the first reflection points and bass traps. This means:
- 2 panels on the side wall, first reflection points (one per wall)
- 4 bass traps in the vertical corners (one per corner)
- 1-2 panels for rear wall absorption
This configuration addresses the two most impactful zones and delivers noticeable improvement in stereo imaging and bass tightness. Most home studio builders hear a significant difference immediately after this phase.
Standard Tier ($500-1,500)
With 16-24 panels, add ceiling treatment and expand rear wall coverage:
- All budget tier panels
- Ceiling cloud (4-6 panels above mixing position)
- Additional rear wall panels for full-width coverage
- Front wall treatment behind monitors
- 2-4 additional corner traps for ceiling-wall junctions
This tier achieves balanced acoustic treatment across all six priority zones. RT60 typically drops to 0.4-0.6 seconds, which is suitable for mixing and recording in most genres.
Professional Tier ($1,500-3,000+)
With 24-40+ panels, the room approaches professional studio standards:
- All standard tier panels
- Diffusion on the rear wall or secondary surfaces
- Full ceiling treatment beyond the cloud
- Custom panel sizes for odd-shaped rooms
- Bass trapping in all eight corners (four vertical, four ceiling-wall)
- Material-specific treatments (WPC feature walls, PET felt ceiling tiles)
This tier targets an RT60 of 0.3-0.4 seconds and delivers the tight, controlled sound that professional mixing requires. The investment also includes better materials with higher NRC ratings and more consistent absorption curves.
For a broader context on how many panels different spaces need, our acoustic panel spacing guide covers coverage calculations.
How Material Changes Your Studio Placement Strategy
Panel material is not just a budget decision. Different materials have different absorption characteristics that directly affect where and how you should place them.
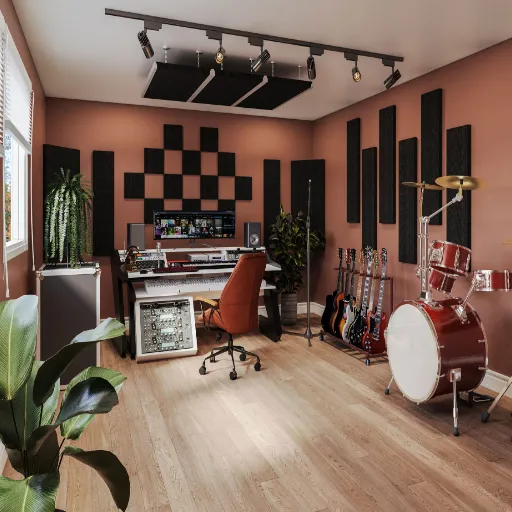
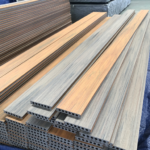
Fiberglass (NRC 0.85-0.95): The industry standard for broadband absorption in home recording studio acoustic panels. Fiberglass panels absorb effectively across the frequency range and can be mounted flat against walls without air gaps. They are the most versatile option for first reflection points and ceiling clouds.
PET Felt (NRC 0.75-0.85): A modern alternative with a clean aesthetic. PET felt panels work well on ceilings and walls where appearance matters. They are lighter than fiberglass and easier to install, but their absorption curve tilts toward mid and high frequencies.
WPC/Wood Slat (NRC 0.50-0.80): WPC panels serve a dual purpose: acoustic control and visual design. They work best as feature walls or decorative treatments that also manage reflections. The critical placement factor is the air gap behind the panel. WPC panels mounted with a 1-2 inch air gap perform significantly better than panels mounted flush. The wood slat design allows sound to pass through to the absorptive backing material, making the air gap an essential part of the acoustic system.
Acoustic Foam (NRC 0.40-0.70): Foam is the budget option, but it has serious limitations. Foam absorbs high frequencies well but does almost nothing for frequencies below 300 Hz. Placing foam in corners as a “bass trap” is ineffective. Foam works for high-frequency flutter echo on walls, but should not be your primary treatment material.
| Material | NRC | Placement Adjustment | Best Application |
|---|---|---|---|
| Fiberglass | 0.85-0.95 | Mount flat, no gap needed | First reflection points, ceiling clouds |
| PET Felt | 0.75-0.85 | Mount flat, light framing | Ceiling tiles, wall panels |
| WPC/Wood Slat | 0.50-0.80 | 1-2 inch air gap required | Feature walls, decorative treatment |
| Acoustic Foam | 0.40-0.70 | Mount flat, limited use | Flutter echo, supplementary HF treatment |
Mixing Position and Monitor Placement
Before you mount a single panel, set up your mixing position correctly. Panel placement is relative to where you sit, so getting the listening position right is the foundation of the entire studio acoustic treatment layout.
Mixing Position Checklist:
- Listening position at 38% of the room length from the front wall
- Equilateral triangle: head-to-monitor distance equals monitor-to-monitor distance
- Tweeters at seated ear height (38-44 inches from the floor)
- Monitors angled inward at 30 degrees each (60-degree total angle)
- Isolation pads under monitors to decouple from the desk
- Avoid the center of the room (50% of the length) due to null zones
The 38% rule is the starting point. Place your listening position at 38% of the room’s length, measured from the front wall. This position minimizes the impact of the strongest axial modes (standing waves that run the length of the room). It is not perfect for every room, but it is the best default starting position.
Studio monitors should form an equilateral triangle with your head. If your monitors are 4 feet apart, your head should be 4 feet from each monitor. The tweeters should be at ear height, angled inward to point at your ears. This creates the 60-degree listening angle that stereo mixes are designed for.
Monitor placement affects panel placement in two ways. First, the distance between monitors and the front wall determines where bass traps behind the monitors should go. Second, the angle of the monitors determines where the first reflection points fall on the side walls.
Avoid placing your listening position at the exact center of the room (50% of the length). The center point sits in a null zone where the strongest room modes cancel each other out. This makes bass response uneven and unreliable for mixing decisions.
When monitors sit on the desk, decouple them with isolation pads. Desk reflections bounce sound upward toward the ceiling, creating comb filtering that ceiling panels alone cannot fully correct.
Common Home Studio Acoustic Panel Placement Mistakes
Even with the right panels, placement errors can waste your budget and leave acoustic problems unsolved.
Treating only one wall. Covering the wall behind your monitors while ignoring the side walls creates a lopsided acoustic environment. Sound still reflects off untreated surfaces, and the asymmetry distorts your stereo image. Always treat both side walls equally.
Ignoring corners. Corners are where bass problems live. Skipping bass traps to save money means low-frequency buildup persists regardless of how many wall panels you install. Bass traps should be among the first purchases in any acoustic panel placement home studio project.
Mounting panels too high or too low. First reflection points are at seated ear height, typically 38-44 inches from the floor. Panels mounted at standing eye level (60+ inches) miss the primary reflection zone. Measure from your seated ear position, not from the floor.
Using foam-only treatment. Acoustic foam absorbs high frequencies but leaves low and mid frequencies untreated. A room with foam on every wall can still have severe bass problems. Combine foam with fiberglass or mineral wool bass traps for balanced treatment.
Over-treating high frequencies. Too many thin panels absorb high frequencies excessively while leaving bass untouched. This creates a dull, lifeless room that sounds worse than the untreated space. Use thick panels (4+ inches) for bass treatment and thinner panels (2 inches) for high-frequency reflection points.
Not verifying with measurement. Guessing at acoustic results leads to guessing at panel placement. Measure your room before and after treatment. Free tools like Room EQ Wizard show you exactly what your panels are doing.
Measuring Results: Before and After
The only way to know if your acoustic panel placement is working is to measure. Guessing by ear is unreliable, especially in a room you spend hours in daily.
RT60 is the primary measurement. For home studios used for mixing and recording, target 0.3-0.5 seconds measured across 500 Hz to 4 kHz. Measure before treatment, after each phase of treatment, and after any changes to panel placement.
Free measurement tools make this accessible:
- Room EQ Wizard (REW): The industry standard for room measurement. It generates frequency response graphs, waterfall plots, and RT60 measurements with a calibrated microphone.
- ClapIR: A smartphone app that measures impulse response. Less precise than REW but useful for quick before-and-after comparisons.
When measuring, place the microphone at the exact listening position. Measure with and without panels in place to see the difference. If RT60 is still above 0.5 seconds after treating all six priority zones, you likely need more bass trapping or thicker panels.
The subjective test matters too. After treatment, listen for bass tightness (do low notes sound controlled or boomy?), stereo imaging (do instruments pan cleanly from left to right?), and vocal clarity (do vocals sit forward in the mix or get buried?). These qualities improve predictably when home studio acoustic panel placement follows the priority zone framework.
Home Studio Acoustic Panel Placement for Video Calls
Post-2020, many home studios serve double duty as video call spaces. This creates a unique acoustic panel placement challenge: the treatment that works for recording may not be optimal for video calls.
For video calls, the camera-facing wall is the priority. This is the wall your camera sees, and it is the wall your microphone hears reflected. Place absorption panels on this wall at the height of your seated torso and head. This reduces the room echo that makes you sound like you are in a bathroom on Zoom calls.
Microphone reflection control is the second priority for video calls. If you use a condenser microphone (common in home studios), it picks up reflections from every direction. The panels you installed at first reflection points for mixing also help with video call audio, but you may need additional treatment on the wall directly behind your microphone.
Quick adjustments for switching between recording and video calls are possible if you use portable panels on stands. Position them at first reflection points for mixing, then move them to the camera-facing wall for calls. Fixed panels should be placed where they serve both uses: side walls at first reflection points and the ceiling cloud above the desk.
Frequently Asked Questions
Where should acoustic panels be placed in a home studio?
Place acoustic panels at six priority zones: first reflection points on both side walls, a ceiling cloud above the mixing position, bass traps in all four vertical corners, absorption or diffusion on the rear wall, broadband absorption on the front wall behind monitors, and floor treatment if you have hard floors. Start with the first reflection points and bass traps for the biggest improvement per panel.
How many acoustic panels do I need for a home studio?
A small home studio (100-150 square feet) needs 12-20 panels for basic treatment: 4 corner bass traps, 2 first reflection panels, 2-4 ceiling panels, and 4-6 rear and front wall panels. Larger rooms (200-300 square feet) need 20-30 panels. The exact count depends on your material choice and target RT60. Our acoustic panel calculator helps determine the right number for your room size.
Should I put acoustic panels behind my studio monitors?
Yes. Panels behind studio monitors absorb rear-firing sound from ported monitors and reduce front wall reflections that bounce back toward the listening position. Use broadband absorption (4-inch fiberglass or mineral wool) for this location. Mount the panels flush against the wall or with a small air gap for improved low-frequency absorption.
Do bass traps go in all four corners?
Place bass traps in all four vertical corners for the best low-frequency control. If your budget allows only two, prioritize the two corners behind the listening position. The four ceiling-wall corners are the next priority. Bass traps should extend floor-to-ceiling for maximum effectiveness.
Can acoustic panels improve my recordings?
Proper acoustic panel placement dramatically improves recordings by reducing room coloration, controlling reflections, and tightening bass response. Vocals recorded in a treated room have less reverb and clearer articulation. Instruments recorded in a treated room have a more accurate tone and better separation in the mix.
How high should acoustic panels be mounted in a studio?
Mount first reflection point panels at seated ear height, typically 38-44 inches from the floor to the center of the panel. Bass traps should extend from floor to ceiling in corners. Ceiling clouds hang 2-4 feet above the listening position. Do not mount panels at standing eye level if you mix while seated.
What is the best acoustic panel layout for mixing?
The best layout for mixing treats the first reflection points symmetrically, places a ceiling cloud directly above the listening position, and includes bass traps in all corners. The listening position should sit at 38% of the room length from the front wall. This configuration delivers the balanced frequency response and accurate stereo imaging that mixing requires.
Do acoustic panels soundproof a home recording studio?
No. Acoustic panels control reflections and reduce reverberation inside the room, but they do not soundproof it. Soundproofing requires adding mass (heavy walls), decoupling (isolated structures), and sealing air gaps. Home recording studio acoustic panels improve what you hear and record inside the studio, while soundproofing prevents sound from leaking in or out. These are two separate projects with different materials and methods.
Conclusion
Home studio acoustic panel placement is not about covering walls with foam. It is about placing the right material at the right location in the right order. The six priority zones, first reflection points, ceiling cloud, bass traps, rear wall, front wall, and floor, provide a framework that works for any room size and budget.
Start with the zones that deliver the most impact. First reflection points and corner bass traps transform a room more than any other treatment. Add ceiling and rear wall treatment when your budget allows. Measure your results at each phase so you know exactly what each panel contributes.
Whether you are building a vocal booth, a mixing room, or a hybrid studio for recording and video calls, the principles are the same. Follow the priority zones, choose materials that match your acoustic goals, and verify with measurement. The difference between a treated and untreated home studio is the difference between guessing and knowing.
For a complete overview of acoustic panel placement across all room types, visit our acoustic panel placement guide.
Categories:
Blog
Related Articles