Installing WPC Wall Panels: A Step-by-Step Installation Guide
In terms of adding beauty and life to your interiors, WPC (Wood Plastic Composite) wall panels are the ones that literally take over the market of presents and designers. These panels not only give a new look to your area but also demand very little maintenance and provide very long durability. The question that comes to mind is what the proper installation technique is in order to achieve the maximum output from these panels? This article will be your definitive guide to installing WPC wall panels step by step. Step by step, it will lead you through the process giving you clear instructions, helpful hints, and professional advice. It doesn’t matter whether you are a DIY enthusiast or a professional; the knowledge shared here will guarantee you a flawless result.
Understanding WPC Wall Panels
WPC (Wall Panels of Wood-Plastic Composite) is a long-lasting and flexible construction material that integrates wood fibers and plastic. They are a strong and light substitute for standard wood panels applicable in both indoor and outdoor environments. WPC panels resist moisture as well as termites and warping, so they are the perfect choice for places with a lot of humidity. The very low maintenance required of them and the fact that they come in a variety of colors and textures contribute to making them a go-to option for modern design projects.
What are WPC Wall Panels?
WPC (Wood Plastic Composite) wall panels are the most advanced and eco-friendly alternative to the needs of contemporary construction and design. The mixture of wood fibers, plastic, and other additives is the reason for the panel’s long-lasting, attractive, and useful characteristics. Moreover, WPC panels are tailored to overcome numerous shortcomings of conventional wood and other materials.
Features of WPC Wall Panels:
- Durability:
WPC panels exhibit remarkable resistance to moisture, termites, and fungi, which assures their longevity for both indoor and outdoor use. - Weather resistance:
Panels could resist the severest climatic conditions,s which were their strongest point for being chosen as exterior wall cladding. - Low maintenance:
WPC panels are a much better alternative than wood in the sense that they don’t need polishing, painting, and sealing done regularly. Their upkeep and cleaning are effortless. - Eco-friendly composition:
Probably the best thing about WPC is that the recycling of wood fibers and plastics minimizes the negative environmental impact to a great extent compared to traditional materials. - Versatility:
The WPC panels are available in a variety of colors, textures, and designs that can easily match a large number of architectural styles.
Market Data and Usage:
The newest market study has found that WPC wall panels are becoming more and more popular among consumers, thanks to their environmental friendliness and versatile applications. The worldwide WPC market was valued at $5.9 billion in 2022 and is predicted to grow at a compound annual growth rate of 11.4% during the period of 2023-2030. Furthermore, the usage of WPC wall panels in modern-day design is gradually winning favor across sectors such as commercial, residential, and public infrastructures, among others.
Applications:
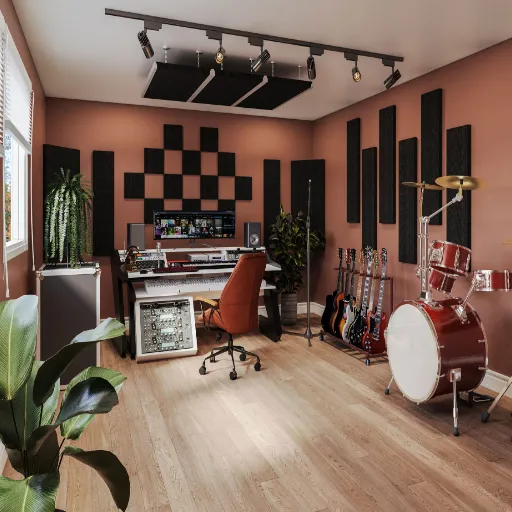
Indoor Design
Aesthetically pleasing and modern, giving the effect of a finished, contemporary look—ideal for accent walls, ceilings, and partitions.
Outdoor Cladding
Excellent for exterior walls, balconies, and fences as they can withstand the forces of nature and last longer.
Industrial Use
Facilities that are noise-sensitive increasingly use the material for their soundproofing and sonic-appealing facades, thereby making the city more livable.
WPC wall panels are setting new benchmarks in the construction and design fields by their remarkable performance and beauty. If you wish for any of the qualities, such as eco-friendliness, elegance, or durability, WPC wall panels are the ultimate solution.
Benefits of Using WPC for Wall Cladding
- Durability:
WPC wall panels are extremely durable and moisture, rot, and pest resistant, which makes them a long-lasting option for cladding applications. - Low Maintenance:
Frequent painting, sealing, or sanding is not required for them, so their upkeep is minimal. - Eco-Friendly:
WPC is an environmentally friendly material made of wood fibers and recyclable plastics, and it helps reduce waste. - Aesthetic Appeal:
WPC panels come in a range of colors and finishes that give the walls a modern and chic look. - Weather Resistance:
They do not warp or fade when subjected to extreme weather conditions such as UV rays and rain. - Versatility:
WPC panels, considered to be both environmentally friendly and easy to install, are useful for both outdoor and indoor applications and render design flexibility.
The practicality of WPC asa wall covering is mainly grounded on its price, eco-friendliness, and beauty, which are the primary advantages that lure customers to select it.
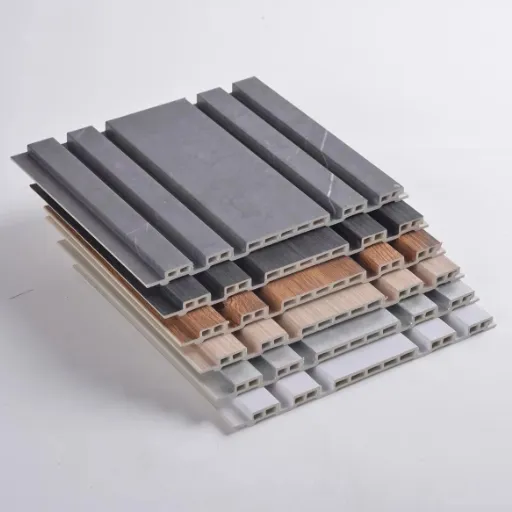
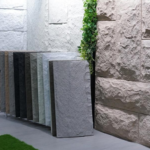
Types of WPC Wall Panels
It brings all and sundry alike to finish flour with a different shade of finish within a quite effective interior. So far. underscores aesthetic agreement among the pertinent professionals.
3D WPC Wall Panels
The decorative wall panels with embossing or grooves create a three-dimensional effect, indicating their applicability for wall accents in modern interiors where light and depth are imparted to the space. They are so aesthetically pleasing that they are the most popular in living rooms, bedrooms, or offices, etc.
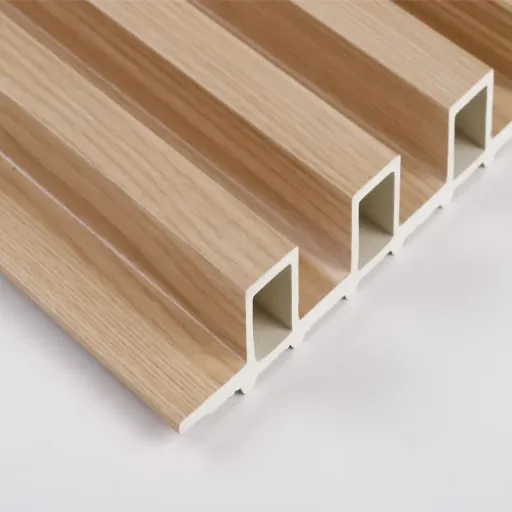
Interior WPC Wall Panels
The indoor variants of these panels are characterized by a perfect, elegant, and tough finish. They are quite light and come in a range of colors and surface textures; thus, they can be fitted in the living room, kitchen, and even hallway areas. Besides, their insulation properties against moisture are excellent.
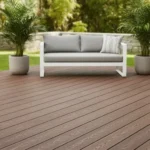
Exterior WPC Wall Panels
The outdoor panels have been specially made to endure the harshest of climates, including torrential rain and direct sunshine. Their use is mainly in the areas of facade or wall cladding, fence, and porch applications. Such panels are highly resistant to any form of degeneration, such as rotting, warping, and even fading.
Acoustic WPC Wall Panels
Auditoriums or home theaters are some areas where these boards will fit best since the panels are soundproofed by design. Acoustic WPC panels annihilate echoes and sound levels thereby improving the quality of the auditory environment.
Decorative WPC Wall Panels
These panels are mainly engaged in giving birth to originality through textures, patterns, and visual effects. The use of such panels is more common as artistic pieces that can change the personality of the common walls covered with art.
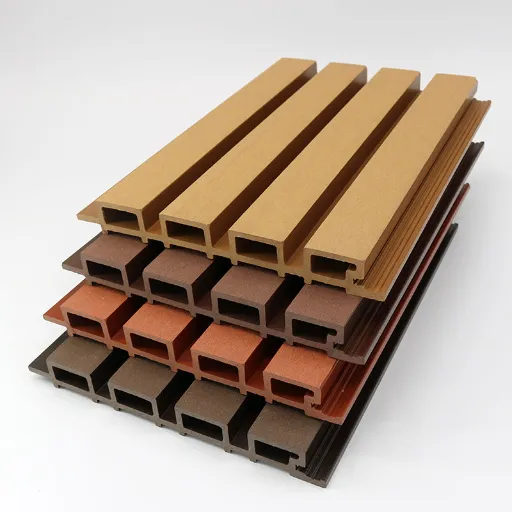
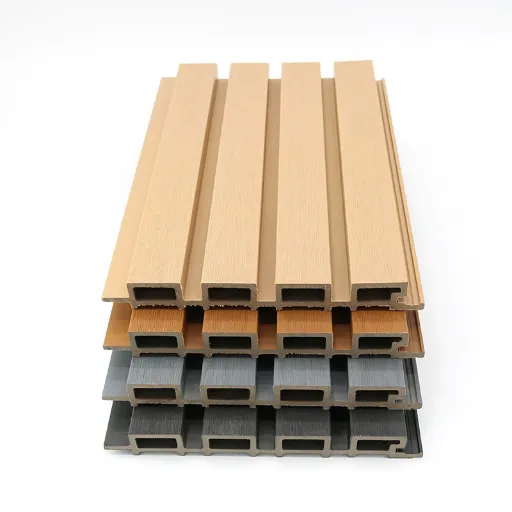
Hollow WPC Wall Panels
The hollow WPC wall panels are not only lightweight but also cost-effective, so that they can be widely used in applications requiring long spans and flexibility. Their installation is not just easy, but the durability of these panels remains good for both indoor and outdoor use.
Data Snapshot (based on recent online trends)
- The worldwide market for WPC cladding is expected to expand at a CAGR of 10.2% during the period of 2023 to 2030, and this growth will be mainly supported by the demand for green products.
- 3D WPC panels are among the high-growth segments, and they are being widely accepted owing to their contemporary and extremely attractive designs.
- The use of acoustic WPC panels has increased, especially in the commercial and luxury residential sectors, indicating a growing demand for noise reduction.
The selection of the appropriate WPC wall panel type is reliant on your individual requirements, including but not limited to the aesthetic aspect, its functional role, and the nature of the environment.
Preparation for Installation
- Surface Assessment:
Proper panel adhesion requires a thoroughly cleaned, dried, and debris-free wall surface. Perform repairs on cracks and rough spots. - Measurements:
The wall dimensions have to be precisely measured so that the number of panels necessary can be calculated. Trimming and cutting, if any, should also be considered - Tool Check:
All the required tools like measuring tape, level, adhesive,e and cutting tools should be prepared. - Panel Inspection:
Installation should be preceded by the inspection of WPC panels for any kind of damage or defects. - Acclimatization:
A minimum of 24 hours should be allowed for the panels to rise to the room temperature before installing.
Adhering to these steps will make the installation process quite smooth and make the improvements completely visible.
Choosing the Right Wall Surface
Choosing the correct wall surface for your WPC panel installation is very important to get the best results in terms of both the look and the durability of the product. To start with, it is important to clean, dry, and level the wall surface really well. If the walls are not even, they will not be able to fit, and the overall aesthetic of the installation may get worse. If you want the best adhesion, then a smooth concrete wall, plastered surface, or drywall is definitely the way to go.
On top of this, checking the moisture content of the wall is very important according to the data. Industry guidelines state that walls should have a moisture content of less than 12% to avoid adhesive failure or warping of your panels over time. Moisture meters will be very useful devices that provide you with exact measurements of the moisture present in the wall before you consider going ahead with the installation.
In case there are any imperfections on the existing wall surface, it would be a good idea to put on a primer first to seal the surface and make the bond stronger. Painting or plastering new walls should be allowed to dry out completely—normally a minimum of 14 days—before WPC panel installation can start. For tile or wood surfaces, the operations of a light sandpaper treatment and bonding agent application will very much facilitate panel attachment by providing a coarser surface for adhesive grip.
Keeping all these factors in mind, not only will you ensure a proper installation, but you will also get the durability and the beauty of the project as your main benefits.
Measuring and Planning Your Layout
WPC panel installation is just going to be perfect and totally professional, if, first of all, accurate measurement and thoughtful planning. Initially, it is necessary to consider the height and width of the wall where the panels will be placed. Using a measuring tape, you should measure all dimensions of the parts being installed, and also measure doors, windows, and any other impediments to then deduct these areas from the total wall space in order to obtain the precise panel requirement. Do not forget to add an extra 5–10% to your material calculations, considering cuts, mistakes, and repairs in the future.
With the use of a level or laser level, take a straight and even baseline marking on the wall to serve as a guide while installation takes place. Thus, you could be sure of the correct alignment of your panels, and no gaps would be present, norwould the installation be done incorrectly. Furthermore, it would not only be a matter of selecting the layout pattern (like vertical, horizontal, or custom designs) but also a matter of visualizing the positioning of the panels and making minor changes to prevent small and inconvenient cuts at edges or corners.
For better efficiency, a majority of experts suggest layout templates or mockups for planning complex installations, especially in cases of walls with distinctive designs or irregular zones. The usage of 3D layout planners, which are available online, is also one of those great ways through which you can visualize your project digitally before commencing the real work. The time saved, reduction in material waste, and flawless finish are all benefits of proper measurements and detailed planning.
Step-by-Step Installation Process
1
Prepare the Surface
Clean the area where the installation will be. Dust, dirt, and any preexisting materials that might affect the bonding or the placement must be taken away. The surface must be perfectly smooth and dry.
2
Measure and Mark
Take accurate dimensions of the area with a tape measure. Mark points or lines for reference as a guide to obtain correct alignment during the installation process.
3
Cut Materials as Needed
Materials have to be cut according to the size of the space while being very careful with the edges and corners. Appropriate cutting tools should be used to get clean cuts.
4
Apply Adhesive or Fasteners
Depending upon the type of material, either spread adhesive evenly or place fasteners like screws or nails to the inevitable bonding of materials.
5
Position and Install
With great care, match the materials to your measurements and markings. If the pressing or securing is done, make certain there are no openings.
6
Check Alignment and Finish
Take a look at the installation regarding the alignment and the proper placement. Adjust it if need be. Once you are satisfied, cut the edges and get rid of the excess adhesive or residue.
7
Final Inspection
Go through the whole installation again to make sure everything is secure and properly aligned. If necessary, do any further touch-ups needed.
Cutting the Panels to Size
The right sizing of panels is the most important point to get a perfect fit and a professional look. Make accurate cuts by following these steps thoroughly:
Measure Twice, Cut Once
Get started by measuring the spot where the panel is going to be placed. With the help of the measuring tape, take down the exact dimensions while keeping in mind all the oddities such as slanted edges or bumpy places. Take your measurements carefully, verify them, and then move on.
Mark the Panels
The next step is to properly and clearly, with a straight line or a chalk line, draw and cut the panel, using a ruler, for marking straight cuts. However, a template or stencil can be good for marking the shape if the edges are curved or irregular.
Choose the Right Tools
The first step in making a panel is choosing the right tool for the material:
- For wood or MDF panels: circular saw or a straight-edged table saw can offer clean cuts along the edges.
- Plastic or PVC panels: To avoid tearing, a carefully sharpened handsaw or jigsaw will do the trick.
- Go with cutting shears or a metal-cutting saw that has the right blade type for your material.
A study by Google shows that working with tools having carbide-tipped blades not only prolongs the life of the blades but also results in less roughness on the cuts, even in the case of difficult materials.
Secure the Panel
Put the panel on a leveled and strong surface like a workbench and fix it with clamps to stop it from moving while cutting. Safety and precision are guaranteed this way.
Cut with Precision
Cut along the lines you have marked with great care. Take slow and even motions so that the material does not splinter or the cuts are not uneven. If applicable, use masking tape along the cut line to keep the chipping from happening.
Smooth the Edges
After you finish cutting, take sandpaper, a file, or a proper smoothing tool, and then remove the rough edges or burrs. This procedure is extremely necessary for plywood or metal, where the sharp edges are still present after cutting.
Test Fit the Panels
Just before installing the panels, test them first in the place of their final installation to check if they really fit. Do the necessary cutting to adjust for snug alignment or irregularities.
Aesthetic quality of the final installation is not the only reason why cutting your panels accurately takes time; it also cuts down on the waste of materials and the need for repeating the work.
Installing WPC Wall Panels
Applying WPC (Wood Plastic Composite) wall panels is a simple procedure that combines aesthetics and durability, and if done properly, the result will be a successful installation. Therefore, a thorough step-by-step guide with key points and considerations is provided below:
Prepare the Surface
Before installing, make sure the wall surface is clean, dry, and smooth. If the wall is uneven, it might be necessary to sand it down or apply a wooden framework to level the surface.
Measure and Plan
First, measure the wall dimensions with precision to calculate the number of panels needed. Among the recent trends, the expert opinion also supports that WPC panels come in standard sizes of 8 x 4 feet or more; thus, one has to determine which category their project falls into. Planning the layout not only prevents waste due to cutting but also saves about 20% of the total material cost.
Choose Mounting Methods
WPC panels can be fixed directly on wallsby applying adhesive or screws, depending on the wall type and the user’s choice. To illustrate this:
- Adhesives give the best results on walls that are very smooth, like those made of cement or painted ones, by offering a seamless appearance.
- Screws supported with wall plugs are most effective on brick, wood, or uneven surfaces where the need for secure fixing is greater.
Install Battens for Ventilation (Optional but Recommended)
The installation of wooden or aluminum battens (spaced 2-3 feet apart) is a good practice for the longevity of the panels, especially in humid areas. The battens will allow proper air circulation behind the panels and thus will prevent moisture damage over time.
Cut Panels Accurately
A circular saw or jigsaw will be a good tool for cutting WPC panels to the sizes needed. WPC boards are generally of a density of around 0.55-0.70 g/cm³, which is a major reason for being easy to cut and work with, but perfection is really important for clean edges.
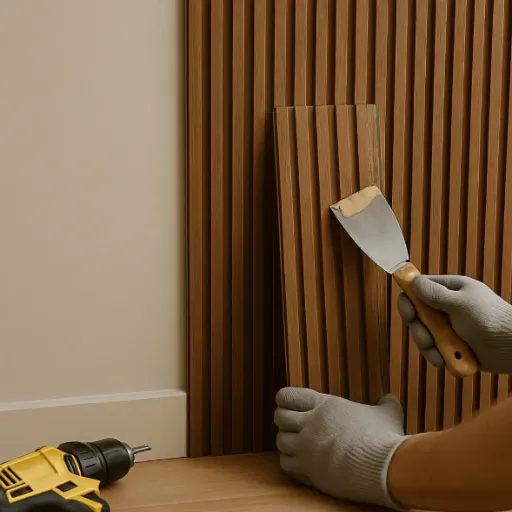
Fix the Panels
When applying adhesive, put it evenly on pthe panel’s back and press the panel firmly on the wall. Keep pressing it for a couple of minutes for the initial bond. If screws are used, first drill the holes in the panels to avoid splitting.
Seal and Finish
Silicon or waterproof sealant will be required to seal the edges and joints with an overall smoothing effect and no water getting in. This is a must if the installation is in a bathroom or kitchen where the moisture level is already high.
Maintenance and Longevity
After the installation process, the WPC panels are going to require very little maintenance. Just regular cleaning with a damp cloth will do the job of keeping the panels looking fresh. The average lifespan of WPC materials is 15-20 years, thus providing long-term cost-effectiveness when compared with traditional materials like wood.
Benefits and Trends in WPC Wall Panel Usage
Recent market analysis indicates that the worldwide need for WPC will more than double in ten years’ time, with a CAGR of over 12%, thus making the market size around $12 billion. The main factor behind this trend is the combination of environmental sustainability and durability of WPC, which can be attributed to its composition of recycled wood and plastic. Soundproofing and thermal insulation characteristics of the product make it more and more common in both commercial and residential sectors.
If you take note of these steps, you will get a WPC wall panel installation that is both strong and good-looking, besides being in line with the current design and sustainability trends.
Securing the Panels in Place
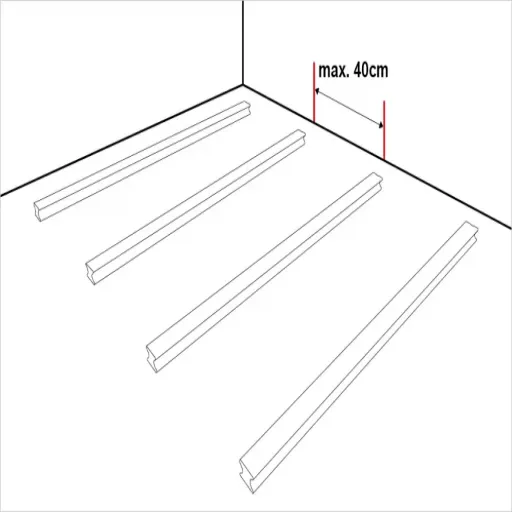
Securing WPC wall panels in the proper way is a major step to durability and a neat finish. Start by making a strong base framework, which is usually aluminum or wooden battens, that are about 350mm to 400mm apart. The panels get the right support with this spacing, and at the same time, the space is sufficient for heating and cooling, which will not cause the material to crack. Check that the framework is aligned just right with a spirit level, since even small misalignments can lower the whole visual appeal and the strength of the structure.
Now that the framework is done, fix the starter clip at the wall’s bottom edge, and make sure that it is attached firmly with screws. You can then place the first WPC panel into the starter clip, making sure it is positioned properly. After that, you can fix each panel by screwing clips at the areas of the grooves marked for this purpose, which will make the panels stable and, at the same time, will not hurt the material. Shift to the following board alignment with the previous board and repeat this, so that the plan squares the entire area.
The most recent data suggests that stainless steel screws and clips should be used to secure the panels, as they will not rust or corrode as easily as other materials, particularly in the outside and moist areas. If the manufacturers’ standards and guidelines for the products are followed, the panels can last for about 20-25 years. The effect of an installation done right is in the aesthetics and, at the same time, the resistance of the panels to any environmental elements like UV rays, rain, and temperature variations.
Finishing Touches
If you want a finish that is both professional and durable, cleaning of the panels should be done first of all, so that no dust and dirt are left for the final check. Check whether all the screws and clips are tight and straight. If suggested, apply protective coatings to enhance the weather-resistance. Finally, check again for any imperfections that can be seen and fix them so that the quality and beauty of the panels remain.
Sealing and Maintaining WPC Wall Panels
The proper sealing and maintenance of Wall Panels made of Wood-Plastic Composite (WPC) are the key factors of the life span and aesthetic appeal of the panels. The latest WPC panels are meant to be practically maintenance-free in comparison with other materials; however, occasional care can still work wonders for their performance. Most of the WPC panels are furnished with a seal as part of the manufacturing process; however, adding a layer of sealant that is of the same quality or better can be just the right tickle of protection that is needed against moisture, UV rays, and stains. This applies especially to those panels that are placed under unfavorable weather conditions.
WPC panels are to be cleaned at first place regularly to keep them clean and free from dirt, grime, and debris. A solution of warm water and mild detergent is most often enough, together with a soft-bristled brush that does not harm the surface. For stains or mildew, a specialized composite material-safe cleaner is to be used. The latest findings claim that a cleaning schedule carried out every three to four months can be responsible for the WPC panels’ lifetime being increased by as much as 30 percent.
Moreover, once a year, check up of the panels for any damage, such as cracks or deformation, should be done. WPC panels are resistant to rotting and insects, but it is always better to get minor issues solved if they appear to avoid further damage. Through appropriate sealing and maintenance, not only are the panels made to last and be attractive, but also the money that would have been spent on premature replacement is saved in the long run.
Common Mistakes to Avoid
Improper installation and maintenance of wall cladding can spoil their life span and look; hence, it is better to be aware of the following key mistakes that are usually committed:
Improper Installation Techniques
It is likely that improper installation was the main cause of more than 60% of cladding problems, according to development data. Different improper installation methods could include using the wrong fasteners or not leaving enough space for expansion, and this usually results in warping or cracking after some time.
Neglecting Regular Cleaning
The process by which cladding surfaces become unappealing and lose their durability is quickened by the accumulation of dust, dirt, and moisture. Statistics indicate that the lifespan of certain cladding types can be reduced by as much as 20% if not cleaned regularly. The use of mild detergent and water for regular cleaning is a must for this problem.
Skipping a Weatherproofing Layer
One of the typical mistakes is the non-installation of a proper waterproof or weatherproof barrier behind the cladding. Water cut through, and subsequently, mold and structural problems will not only impact the cladding but also the entire building. The latest case studies indicate that buildings without these barriers are 40% more prone to moisture damage.
Ignoring Maintenance Needs
The assumption that cladding materials such as WPC or vinyl do not require maintenance will eventually lead to major repairs. Though these materials are strong, they will need periodic examination for cracks, warping, or loose panels, which will be a way of avoiding large expenses in the future. According to industry statistics, proactive maintenance is up to 25% more costly in the long run than reactive.
Mismatched Materials
The selection of incorrect cladding material according to the prevailing climate and the intended use can result in the material’s premature defect. An example will be wood cladding, which suffers in constantly wet conditions unless it receives the right protective treatment. It is estimated that material mismatches lead to about 15% of cladding replacements within the first five years of installation.
333; margin: 25px 0; text-align: justify;”>If you are careful not to make these mistakes and deal with them quickly, then you will be able to keep your wall cladding for a longer period, and it will still work well and look good.
Recap of the Installation Guide
- Choose the Right Material:
Pick out the cladding materials that are the most uncompromising to the environment and to the building specifications. Do not forget to take into account factors like the climate, the longevity of the material, and the maintenance it requires. - Prepare the Surface:
Clean and dry the surface that is going to be in contact with the installation and check its structural stability. The surface that is prepared well supports adherence and longevity. - Ensure Proper Ventilation:
Make use of ventilating spaces that would help air to circulate, thus preventing moisture accumulation and possible damage in the future. - Use High-Quality Fasteners and Sealants:
Go for fasteners and sealants that are of the highest quality, are able to withstand the weather, and thus lock the cladding properly while at the same time protecting it from the environment. - Follow Manufacturer’s Guidelines:
It is crucial that the manufacturer’s installation instructions be followed closely; otherwise, warranties could be rendered void.
Followed with care, these steps will successfully and lastingly enable wall and cladding installation.
Final Thoughts on WPC Wall Panel Installation
The WPC (Wood Plastic Composite) wall panel installation provides a very tough, fashionable, and eco-friendly solution for both indoors and outdoors. The latest WPC panels are now capable of backing up the materials with moisture protection, UV rays, insects, and temperature change,s which are some of the factors determining their longevity in various applications.
Recent industrial reports suggest that WPC panels will be seeing a compound annual growth rate (CAGR) of more than 10% till 2030, which is a clear indication of their increasing adoption in the building and renovation markets. WPC is fast becoming a consumer favorite due to its minimal upkeep, which is a big advantage over conventional wooden materials that require periodic painting and sealing.
The WPC panel installation is a process where effective preparatory work and strict adherence to the installation instructions guarantee not only good-looking but also strong walls. Choosing high-grade materials along with professional installation,n where necessary, can greatly contribute to the life span and performance of the panels. By evaluating all these aspects and making good use of the advantages of the new WPC technologies, you can realize sensational outcomes in your cladding projects.
Reference Sources
How to Install WPC Wall Panels – Easy Step-by-Step Guide
Source: Decostria
Link: https://decostria.com/blogs/news/how-to-install-wpc-wall-panels
Relevance: This guide offers a beginner-friendly, step-by-step approach to installing WPC wall panels. It includes tools needed, preparation tips, and detailed instructions, making it a reliable resource for DIY enthusiasts and professionals.
How to Install WPC Wall Panels: Step-by-Step Guide & Tips
Source: Wall Panel PVC
Link: https://wallpanelpvc.com/how-to-install-wpc-wall-panels-step-by-step-guide-tips/
Relevance: This source provides a comprehensive installation guide tailored for both DIY users and contractors. It highlights common challenges, offers troubleshooting tips, and ensures a flawless finish for WPC wall panel projects.
WPC Wall Panel Installation Manual
Source: Manufacturer’s Installation Guide (Example: Ecoste or Similar Brands)
Link: Typically available on manufacturer websites or product packaging. For example, the Ecoste WPC Installation Guide.
Relevance: Manufacturer-provided manuals are highly reliable as they are tailored to the specific product. They include technical details, safety precautions, and best practices for installation.
Frequently Asked Questions (FAQs)
What is WPC fluted wall paneling and what are the benefits of WPC?
WPC fluted wall panels are decorative cladding panels created from wood-plastic composite with a fluted (grooved) surface that imitates the look of wood while giving more durable character. Among the advantages of WPC are moisture and insect resistance, less upkeep than with natural wood, uniformity in appearance, and easy installation. Premium WPC gives the impression of a wood wall or slat wall without the disadvantages of real timber, hence it is widely used for both interior and exterior applications.
How do I prepare the wall before I install WPC wall cladding?
Proper installation is key, begin with the entire wall being clean, dry, and structurally sound. In the case of an uneven wall, furring strips or battens might be necessary to make a flat surface and also allow an air space between the wall and the cladding. One way to visualize the wall layout is by means of a diagram that shows the orientation of the panels and the location of both the first panel and the clips for the subsequent panels. Consult the manufacturer’s installation instructions for the advised panel back spacing and recommended fasteners.
What tools and materials do I need to install the panels?
Standard equipment consists of a measuring tape, level, chalk line, saw appropriate for composite cutting, drill, screws, and panel clips if made for WPC. Sealant for edges in damp places and safety gear are also required. Premium quality WPC generally includes suggested panel clips and installation guidelines; adherence to these makes the process of putting up WPC wall panels not only more convenient but also helps in ensuring installation and long-term durability.
Can you give step-by-step instructions to install WPC fluted wall panels?
Definitely. Usually, the first step in such instructions is to put in the starter trim or to attach the first panel at the base of the wall, checking its level. Fasten the panel clips either to the back of the panels or to the battens, push the panel strongly into its position, and insert it into the groove of the earlier panel so that the panel edges are locked. Proceed with the next panel while cutting the panels to fit as you come closer to corners or doors. Check if each panel is level, keep an air gap if needed, and adhere to the manufacturer’s instructions for expansion gaps and end trims.
How do I cut the WPC panels to fit around obstacles or at the edges?
Cut the WPC wall panels using a fine-tooth saw or a circular saw blade made for composites. First, measure the panel to the desired size, and then mark the cut line on the back of each panel, which will help in protecting the fluted face. After that, cut it slowly to prevent chipping. While cutting around switches, outlets, or a skirting board, make sure to let the panel sit on the wall and keep the right panel edges as well as the expansion gaps. It may be necessary to carry out custom trimming to make panels fit irregularly shaped areas or use transition trims.
What is the proper way to start—how do I install the first panel and orient the panels?
Start from the bottom of the wall or from a corner, depending on the layout of the room. Put the first panel in a straight line, as this will be the reference point for the entire wall. Fix the first panel with the starter clip or trim, then put the second panel on by inserting the tongue into the groove and pushing the panel strongly till it connects. The direction of panels (vertical or horizontal) must be decided in advance so that it corresponds to the style of the room and the slat wall or fluted wall pattern. Check that the panels are level and that the wood grain perception is consistent over the entire wall.
How do panel clips work and when should I use them?
Wall panel clips are developed to be used with WPC and can be fixed either to the rear of each panel or to the wall battens; they ensure hiding the fixing so that the visible side stays continuous. Securely attach the panels to the wall with the use of panel clips, while permitting such natural processes as expansion and contraction. The clips not only guarantee that the panels are leveled and tightly pressed to the wall but also make it easier to install WPC wall panels, particularly for long runs or complete wall installations.
Categories:
Blog
Related Articles